Operating system requirements: iOS 5.0 or later.
Mobile device: iPad.
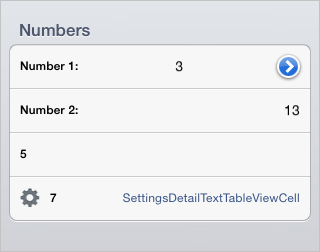
This example describes some methods of working with settings menu cells. After starting the example the following operations are executed:
Text editor cells are displayed, and their values are set.
Text alignment, left padding, and auxiliary indicator are set for the first cell with text editor. After pressing the indicator the development environment console displays pressed cell coordinates.
A basic cell is displayed for settings menu. After pressing the cell the development environment console displays pressed cell coordinates.
A cell with additional description including cell class name and an icon is displayed.
All four cells of the settings menu are combined into one section with the Numbers title.
It is required to add the following file to the base example Displaying of Express Report:
ElementsViewContoller.h/.m. Controller for working with menu settings in the "key-value" format.
Executing the example requires to place the following code in the body of the executeExample method of the ViewController class (see the Displaying of Express Report section):
// Delete all window subviews
NSArray *subviews = [self.view subviews];
for (UIView *subView in subviews) {
    [subView removeFromSuperview];
}
// Get controller for displaying express report
MAExpressAnalysisReportViewController *contr = (MAExpressAnalysisReportViewController *)m_controller;
// Create a custom controller
ElementsViewController *customController = [[ElementsViewController alloc] initWithDelegate: contr];
// Add section title
if([customController getSectionHeader:0] == nil) {
    [customController addSectionHeader:@"Numbers" forSection:0];
}
// Create a cell with text editor
SettingsTextInputCell *textInputCell1 = [SettingsTextInputCell textInputCellWithTitle:@"Number 1:" delegate:customController key:@"NUMBER1"];
// Save each text change in delegate
[textInputCell1 setContinuousUpdating:YES];
// Set auxiliary indicator type
[textInputCell1 setAccessoryType:UITableViewCellAccessoryDetailDisclosureButton];
// Set text alignment by cell center
NSArray *textAlignmentModes = [customController settingsValuesEnumForKey:@"NUMBER1"];
NSTextAlignment alignment = (NSTextAlignment)[(NSNumber *)[textAlignmentModes objectAtIndex: 1] integerValue];
[textInputCell1 setTextInputTextAlignment: alignment];
// Set left padding
[textInputCell1 setLeftPadding: 10.0];
// Add cell to menu
[customController addCell:textInputCell1 atRow:0 inSection:0 withSelector:nil];
// Set value
[customController setSettingsValue:@"3" forKey:@"NUMBER1"];
NSLog(@"Minimum value of the cell NUMBER1: %@", (NSString *)[customController settingsMinValueForKey: @"NUMBER1"]);
// Add a handler of pressing settings menu child cell transition button
NSIndexPath *textInputCellPath = [NSIndexPath indexPathForRow:0 inSection:0];
NSString *textInputCellSelectorString = NSStringFromSelector(@selector(detailDisclosureButtonClicked:));
[[customController accessorySelectors] setObject:textInputCellSelectorString forKey:textInputCellPath];
// Create a cell with text editor
SettingsTextInputCell *textInputCell2 = [[SettingsTextInputCell alloc] initWithTitle:@"2" delegate:customController key:@"NUMBER2"];
// Complement title
[[textInputCell2 textLabel] setText: [NSString stringWithFormat: @"Number %@:", [textInputCell2 title]]];
// Set value
[[textInputCell2 textInput] setText:@"13"];
// Add cell to menu
[customController addCell:textInputCell2 atRow:1 inSection:0 withSelector:nil];
NSLog(@"Maximum value of the cell NUMBER2: %@", (NSString *)[customController settingsMaxValueForKey: @"NUMBER2"]);
// Create a basic cell for settings menu
SettingsCell *settingsCell = [SettingsCell cellWithTitle:@"5" delegate: customController key: @"NUMBER3"];
[customController addCell:settingsCell atRow:2 inSection:0 withSelector:nil];
NSLog(@"Desired height of the cell NUMBER3: %f", [settingsCell height]);
// Add cell press handler
NSIndexPath *settingsCellPath = [NSIndexPath indexPathForRow:2 inSection:0];
NSString *selectorString = NSStringFromSelector(@selector(settingsCellClick:));
[[customController selectors] setObject:selectorString forKey:settingsCellPath];
// Create a cell with detailed description including cell class name and icon
SettingsDetailTextTableViewCell *detailTextTableViewCell = [SettingsDetailTextTableViewCell detailTextCellWithTitle:@"7" delegate:nil key:nil];
[detailTextTableViewCell setDelegate: customController];
// Set data key
[detailTextTableViewCell setKey: @"NUMBER4"];
// Reload data
[detailTextTableViewCell reloadData];
[customController addCell:detailTextTableViewCell atRow:3 inSection:0 withSelector:nil];
NSLog(@"Additional description for the cell NUMBER4: %@", [customController settingsTextForKey:@"NUMBER4" withValue:nil]);
NSLog(@"Whether the cell NUMBER4 is displayed: %d", [customController settingsControlVisibleForKey: @"NUMBER4"]);
NSLog(@"Whether the cell NUMBER4 can be edited: %d", [customController settingsControlEnabledForKey: @"NUMBER4"]);
// Display view
UIView *customView = [customController view];
[customView setFrame:CGRectMake(50, 50, 300, 200)];
// Refresh controller view size
[customController updateSize];
[self.view addSubview: customView];
After executing the example the section with the Numbers title containing four cells is displayed. The first and second cells are used to edit text, the fourth cell contains additional description (corresponding class name) and an icon:

The development environment console displays minimum cell value with the NUMBER1 key and maximum value of the NUMBER2 cell. Desired height is determined for the cell with the NUMBER3 key, additional description including cell class name, display indicator and editing permission are displayed for the cell with the NUMBER4 key:
Minimum value of the cell NUMBER1: 3
Maximum value of the cell NUMBER2: 13
Desired height of the cell NUMBER3: 44.000000
Additional description for the cell NUMBER4: SettingsDetailTextTableViewCell
Whether the cell NUMBER4 is displayed: 1
Whether the cell NUMBER4 can be edited: 1
After pressing the first cell transition indicator and the third cell area the development environment console displays their coordinates. The first index specified in the brackets corresponds to the pressed cell number in the section, the second number corresponds to the section number:
Cell transition (0, 0)
Selected cell (2, 0)
See also: