 To open a license manager
A license manager enables the user to view parameters of the current license, determine license search settings or replace a license, get temporary local license from the license server.
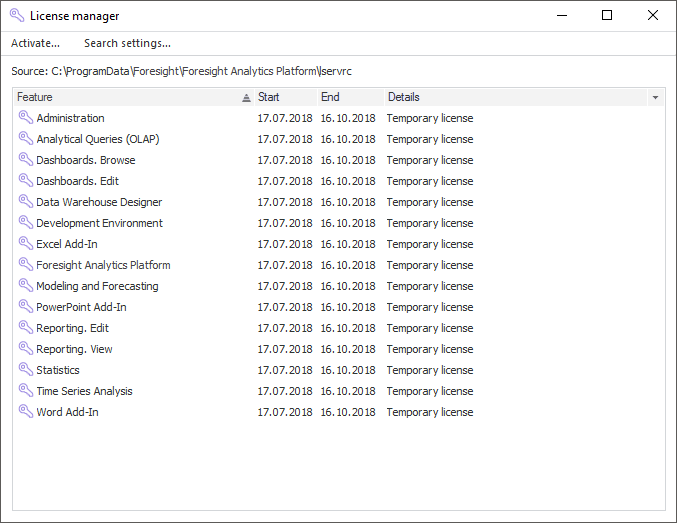
The license manager window appearance depends on the license type in use. See below screenshots of the license manager window for network license and for stand-alone license:


The license manager contains a table displaying license parameters:
Feature. Contains a predefined set of features. The license status for the feature is displayed by means of the icons:
![]() - license for feature is activated.
- license for feature is activated.
![]() - license for feature is missing or expired.
- license for feature is missing or expired.
Start. Start date of feature use. If the start date is not determined, it is marked with a dash.
End. End date of feature use contains the value on using temporary license is active. If the end date is not determined, it is marked with a dash.
Locking. Computer locking code, to which license is locked. If there is no locking, the column will contain a dash.
Details. Contains information about feature:
Unlimited. The license is not limited by time and by number of users.
Connection limit: <number of connections>. Network license with a limit on the number of users.
Available Offline. Network license checked out from stand-alone license server.
Temporary License. A temporary license that enables the user to run the application between the fixed calendar dates only.
Trial Version, Total Days: <number of days>. A trial license provides a possibility to use the application within the specified period from the first startup.
Stand-alone with <license server>. The temporary local license obtained from license server enables the user to work with the application outside the network up to 30 days.
Above the list of features, the license source and its current state are specified in case when there is no license server connection or when there is a limited number of days to use temporary local license. The license source can be a license server, license file path.
To activate, replace or update a stand-alone license:
Click the Activate button.
NOTE. The Activate button is available only for stand-alone licenses.
Select file with activation code using Foresight Analytics Platform activation wizard.
After executing the operations, the desktop application is activated with a stand-alone license, or the current stand-alone license is replaced with the selected stand-alone license.
To replace the current stand-alone license with a network license:
Click the Search Settings button.
Select the Check for Server License Using This Host radio button in license search settings.
After executing the operations and successful license search at the server, the stand-alone license will be replaced with the network license.
To replace the current network license with a stand-alone license:
Click the Search Settings button.
Select the Check for Stand-alone License Only radio button in license search settings.
After executing the operations and successful license search at the workstation, the network license will be replaced with the stand-alone license.
To replace a network license at license server, contact the system administrator.
Click the Search Settings button to change license search parameter settings. After this the License Search Settings dialog box opens.
A network license can enable the user to get a temporary local license to work with the application without an internet connection up to 30 days. When stand-alone licenses are checked out, the number of simultaneously working users with network license decreases to one. The user can use only one repository connection. When the checked out licenses are checked in, or after 30 days a network license is restored.
If temporary local license is no longer required, it can be checked in before the expiration date. After this the license can be checked out again from the license server. When this time elapses, the application is not available. To continue work, connect to the network, where the license server is located.
To work with a network license offline, click the ![]() Check Out from Server button; to check in the checked out license, click the
Check Out from Server button; to check in the checked out license, click the ![]() Check In to Server button.
Check In to Server button.
NOTE. If license server is unavailable, change license search settings to automatically search for licenses on order that the previously checked out license works in stand-alone mode.
To successfully check in the license to the server, license search settings must match the settings that are determined during checking out the temporary local license from the license server.
To set up column display in license manager:
Click the  button at the end of the row with column headers.
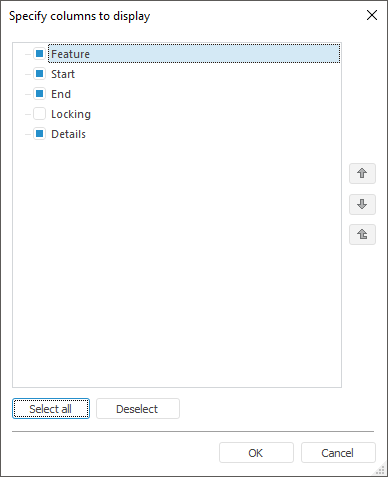
Select or deselect checkbox next to the column with corresponding information:
In the drop-down list.
Using the Select Columns drop-down list item. The Specify Columns to Display dialog box opens.
The Specify Columns to Display dialog box:

To select or deselect all checkboxes, use the Select All or Deselect button.
Use the  and
and  buttons to set the order of columns in the list.
NOTE. It is impossible to deselect checkbox next to the Feature column and change column order. The checkbox next to the Locking column is deselected by default, to display the column, select the checkbox.
See also: